How to Add Subtitles to MP4 Files in Mac/Win (Windows 8 included)
Looking for a hassle-free way to add a subtitle to your MP4 video? It won't be a big deal if you find the right software. This tutorial will show you how to add subtitles to MP4 videos before you know it.
- Part 1: How to add downloaded subtitles to your MP4 video
- Part 2: Edit your own subtitles to create a new MP4 movie
- Part 3: What are subtitles?
Part 1: How to Add downloaded subtitles to your MP4 video
To load your desired subtitles to any format movie you have, we highly recommended our Video Converter Ultimate (Windows 8 supported). With it, you can add subtitles to MP4 video for either saving to a video file to play virtually anywhere, or burning to DVD for watching on TV. All will be done software. No installation of third-party tools is needed.
What video and subtitle formats are supported?
- Video formats: MP4, AVI, MKV, WMV, MPG, MPEG, VOB, TOD, MOD, FLV, and all regular video formats.
- Subtitle formats: SRT, ASS, SSA
After getting subtitle files from internet (most of subtitle files are with .srt, .ass and .ssa file extension.), we need use Video Converter (Windows 8 supported) to merge subtitle with MP4 video into a new file or onto DVD. Now follow easy step to put subtitles on MP4 video in a flash.
Step 1: Import MP4 without subtitles
After installed this subtitle to video converter (Windows 8 supported), run the program and import your MP4 video by dragging video to the primary windows, or by clicking "Add Files" button to locate MP4 video on your computer.
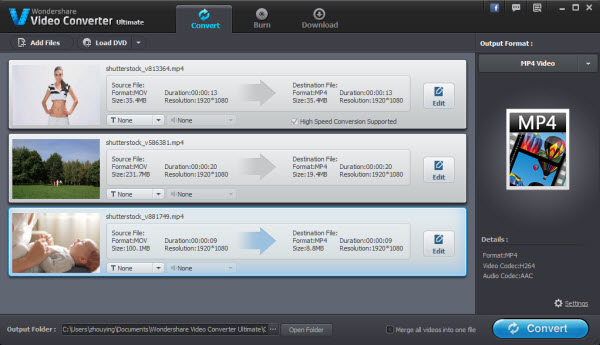
Step 2: Add subtitle to MP4 video
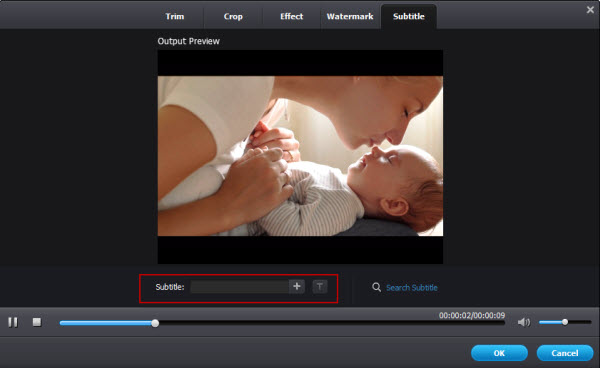
When MP4 video show up in the primary windows, right click it from the list and choose "Edit" button to launch the video editing window. Go to "Subtitle" tab at the top. Load an external subtitle files (.srt, .ssa, .ass) by clicking the "+" button to open the subtitle drop-down list. After the subtitle is loaded, you can preview it at a suitable time with subtitle in the preview windows. The default style will be applied. By checking the "T" option besides, you can also make a custom subtitle style through font, color, size, position, transparency, etc. When you're happy with the MP4 subtitle, click "OK" button to confirm settings and return to the primary window.
Note: You can also stick a text watermark or image watermark to your MP4 video in the above video editing window.
Step 3: Export MP4 video with subtitle or burn MP4 to DVD
Now it's time to save subtitle to MP4 video permanently. Firstly, choose a desired output format by clicking the "Output Format" option on the right side. Then, choose a video format (e.g. keep MP4 format) or device format (e.g. iPhone, iPod, iPad) to convert MP4 video with subtitle to a video file. Finally, click "Convert" button to start conversion. The subtitle will be written permanently on the output video. If you want to burn MP4 to DVD with subtitle, you can burn it in the "Burn" interface.
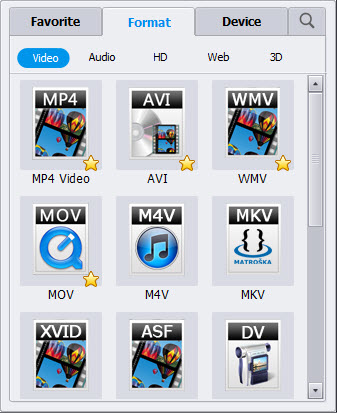
You're done. With Video Converter (Windows 8 supported), you can add subtitles to MP4 video for playing either on computer, device or TV.
Part 2: Edit your own subtitles to create a new MP4 movie
To add subtitles to your recorded MP4 video clips, Wondershare Filmora (originally Wondershare Video Editor) (Video Editor for Mac) makes it pretty easy. This program provides a extensive text templates you can use to add captions for better explanation. Download a free trial here:
This program is available on both Windows and Mac platform. please download the right version as per your operating system. In the following, Windows version is taken as an example.
Step 1: Import your source MP4 files
Launch this program and select "16: 9" or "4:3" aspect ratio as to enter into the primary window. Then click "Import" to load your MP4 videos from file foder on your computer. The imported video clips will show as thumbnails in the left pane.
When you load all MP4 files you need, simply drag and drop them to the Video Timeline.

Step 2: Add subtitles to MP4 video and customize it
Now switch to Text tab, and then drag your favorite template to the place you want to the Timeline. Now you'll see a text thumbnail reading "T".
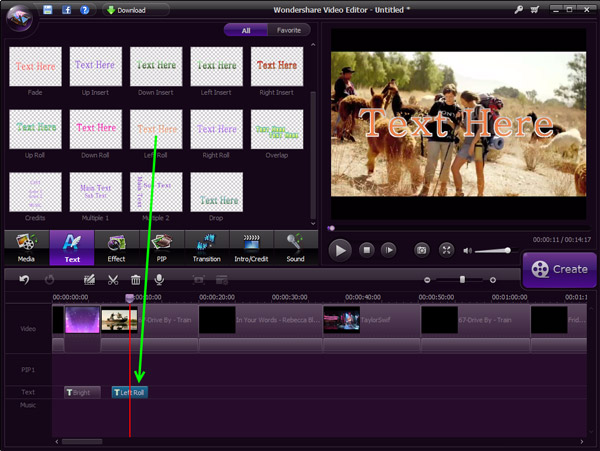
Double click it to access the text editor panel, here you can type in your own text, and customize the font, color, animation, etc. as you like. After that, click Play icon to preview the real-time effect.

When the subtitles come into the right place in your MP4 video, drag the Text file duration to sync for your video. Meanwhile, A Timeline Zoomer is available to zoom in/out the Timeline to help you locate exactly the place you want.
Step 3: Export a new movie
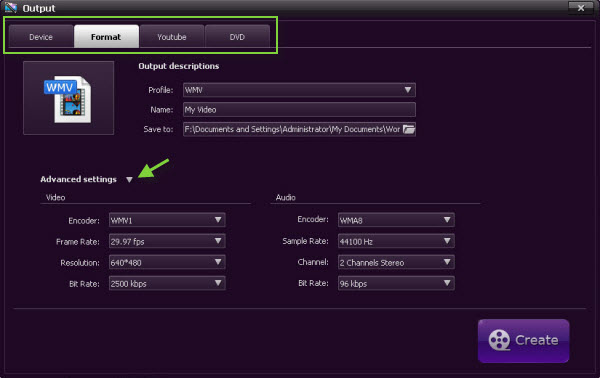
When everything is okay, hit "Create" to export a new MP4 file included with subtitles. In the output window, you can select MP4 from "Format" tab, or go to "Devices" tab to pick up a device icon like "iPad" to save it on your computer. You can even share your creation directly onto YouTube, or burn it to a DVD disk.
The above two methods to burn subtitles to MP4 video will save you a lot of time and trouble. If need, you can also make other video edits with Wondershare Filmora (originally Wondershare Video Editor), like rotate, trim, cut, adjust brightness, contrast, apply background music, transitions, visual effects and more. In that way, you can get the most out your MP4 files. Just download the program to have a try. You will love it.
What are subtitles?
Subtitles are textual versions of the dialog in TV programs, movies, animes, etc., usually put at the bottom of the screen. People who can't understand the spoken dialogue could still know what is playing by watching subtitles. It's also a good way to learn foreign language by adding subtitles. There are two common types of subtitles - softsub and hardsub, which are added to MP4 videos temporarily or permanently with different software. Hard subtitle is added to MP4 video in this article. As for the softsub, they can be display while playing with compatible media player. For example, when you're using VLC Media Player to watch MP4 video, you're able to load subtitle from Video > Subtitle Track > Load File.


